Mica heater RD-2215
group nameMica Heater
-
Min Order1 piece
modelRD-2215
payment method
-
update timeTue, 22 Jan 2013 17:44:46 GMT
Packging & Delivery
Min Order1 piece
Briefing
Detailed
Operating Instructions
Micathermic Heater

General Care and Safety Guide
Thankyou for choosing a Goldair Micathermic Heater. This Goldair Heater hasbeen designed and manufactured to high standards ofengineering and with proper use and care, as described in this leaflet, will give you years of usefulservice. Please read these instructions carefully.
1. Useonly the voltage specified on the rating label of the appliance.
2. Keep all objectsat least 1 meter from the front, sides and rear of the appliance. Do not placeappliance close to radiant heat source.
3. Donot operate in areas where petrol, paint or other flammable liquids are used orstored.
4. Do not insert orallow foreign objects to enter any ventilation or exhaust opening, as this maycause an electric shock, fire or damage to the appliance. Do not sit on theappliance.
5. Do not operatethis appliance with a damaged cord, plug or after the appliance malfunctions orhas been dropped or damaged in any manner. Return to a qualified electrical person for examination,
6. This applianceis intended for household use only and not for commercial or industrial use.
7. Use thisappliance only as described in this manual. Any other use is not recommended bythe manufacturer and may cause fire, electrical shock or injury.
8. The common causeof overheating is deposits of dust or fluff in the appliance. Ensure thesedeposits are removed regularly by unplugging the appliance and vacuum cleaningthe air vents and grills.
9. Do not useabrasive cleaning products on this appliance. Clean with a damp cloth (not wet)rinsed in hot soapy water only. Always remove plug from the mains supply before cleaning.
10. Do not connectthe appliance to mains supply until completely assembled and adjusted.
11. Switch off anduse handles provided when moving.
12. Do not operatewith cord set coiled up as a heat build up is likely, which could be sufficientto become a hazard.
13.The use of an extension cord with this appliance is not recommended.
14. Donot remove plug from power socket until the appliance has been switched off.
15. Donot remove plug from power socket by pulling cord; always grip plug.
16.Always unplug appliance when not in use.
17. Donot locate the heater directly below any power socket during operation.
18. Do not twist,kink or wrap the cord around the appliance, as this may cause the insulation toweaken and split. Always ensure that all cord has been removed from any cordstorage area and is unrolled before use.
19. This applianceis not intended for use by persons (including children) with reduced physical,sensory or mental capabilities or lack of experience and knowledge, unless theyare supervised or have been given instruction concerning the use of theappliance by a person responsible for their safety.
20. Do not use thisappliance in the immediate surrounds of a bath, a shower, or a swimming pool orother liquids. The appliance must not be immersed in any liquids.
21.When the appliance has been unpacked, check if for transport damage and ensureall parts have been delivered. If parts are missing or the appliance has beendamaged, contact the Goldair Customer Services Team. (refer to details on backpage)
22. If yourappliance does not work, or is not working properly, contact the place ofpurchase or the Goldair Customer Services Team. (refer to details on backpage). Repair work on the appliance by unqualified persons can cause seriousrisk to the user.
23.There are no user serviceable parts installed in the unit.
24. Donot place the unit in wardrobes or other enclosed spaces as this may cause firehazards.
25. This unit is notsupposed to be used in or around locations where foodstuffs, works of art ordelicate articles of science, etc are stored.
26.Indoor use only.
27.Children should be supervised to ensure that they do not play with theappliance.
28.Ensure heater is on a flat, stable, heat-resistant surface.
Overview of your MicathermicHeater
Micathermicheating uses both radiant and convection heating technology. Natural convectioncurrents distribute the heat evenly throughout the room, while radiant heatfrom the heating surface warms people and objects in the room. This heater isequipped with two manual heat settings and an adjustable thermostat.
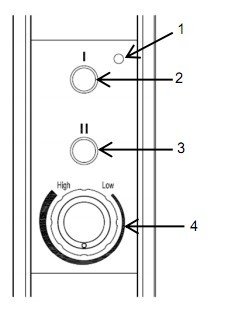
1.Heater 1.Power indicator light
2.Control Panel 2. Power Switch I
3.Front Panel 3. Power Switch II
4.Wheel Bracket 4. Thermostat
5.Wheel

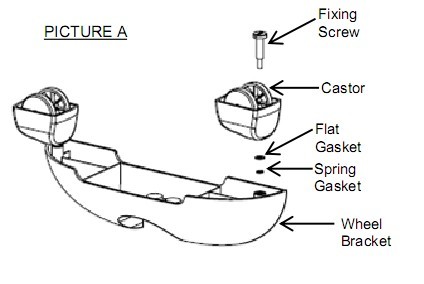
FEET ASSEMBLY
Install castor
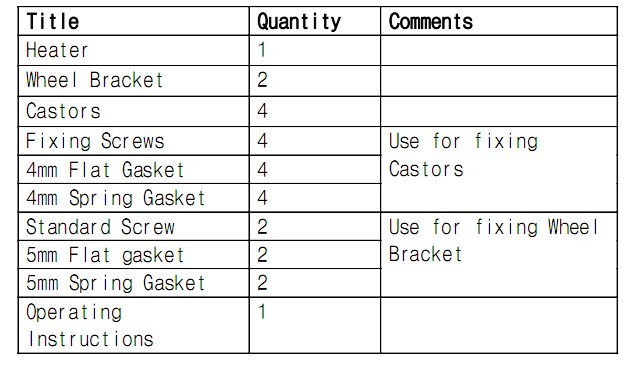
Take out four castors, two wheel brackets, four fixed screws, fourflat-gasket of 4mm diameter,four spring-gasket of 4mmdiameter from list.
According to picture A, Firmly install castor on wheel bracket.
Install wheel bracket
Take both wheel-brackets once castorsinstalled, take two Standard Screws, two flat-gasket of 5mm diameter, two spring-gasket of 5mm diameter. According to picture B, firmlyinstall wheel-bracket on the bottom of the Heater.

Parts Included
Operating your Micathermic Heater
Always choose a safe location for the heater,keeping in mind the safety precautions outlined. Ensure all packaging has been removed fromthe unit before use. This appliance requires no installation, it should be usedsolely as a portable appliance.
WARNING: THIS IS A DOUBLE SIDED HEATER. Keep all objects at least 1 meterfrom the front, sides and rear of the appliance.
HEAT CONTROLSWITCH
The control switch positions are:
0 OFF
I Low Heat
II High Heat
Check that the heat control switch is set to offposition before plugging the heater into the mains supply. For greater economy,use the high heat setting initially and then switch to the low heat setting.
THERMOSTAT
Turn the thermostat knob clockwise until themaximum temperature is obtained on the graduated scale. When the desiredtemperature is reached, slowly turn the knob anti-clockwise until the heaterturns off (you will hear a click). The heater will now cycle on and off tomaintain the set temperature.
CAUTION: never install the heater directly beneath a socket-outlet or insuch a way that people in the baths, showers or pools may have to touch liveparts such as a switch. Important: The radiator must be connected to an earthedoutlet of the appropriate voltage.
Note: When the heater is turned on for the firsttime, it may release a slight, odour or smoke. This odour or smoke is a normaloccurrence caused by the initial heating of the internal heating elements and should not occur again.
SAFETYDEVICE
This appliance has three protection devices: Thefirst device will automatically turn the appliance off if the appliance is notin the appropriate operating position. The second device, automaticallydisconnects & reconnects the appliance at a preset temperature. The thirddevice disconnects the appliancepermanently in case of overheating, bymeans of a thermal fuse. (It is non resettable)
IMPORTANT!NEVER COVER THIS HEATER!
Covering the heater will cause activation of thenon resettable safety fuse.
CARE ANDCLEANING
Do not attempt to dismantle the Micathermic Heater.There are no user serviceable parts. For service or repair, contact anauthorised electrical service technician. The outer shell may be cleaned with asoft, damp cloth. You may use a mild detergent if necessary. After cleaning,dry the unit with a soft cloth. CAUTION: DO NOT let liquid enter the heater.
CAUTION
The Micathermic Heater generates heat during use.Proper precautions must be taken to prevent the risk of burns, scalds, fires orother damage to persons. Do not use this heater with a programmer, timer,separate remote-control system or any other device that switches the heater onautomatically.
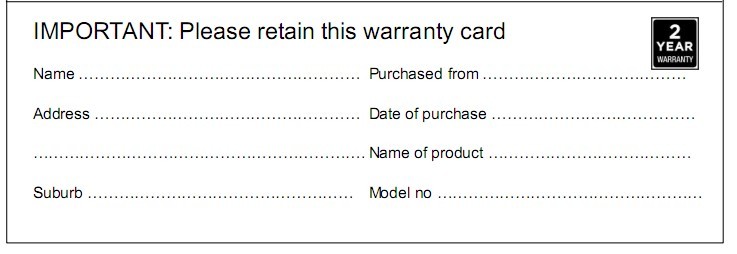
PROOF OFPURCHASE
To receive warranty retain receipt as proof ofpurchase. (Refer to back of booklet).
TwoYear Warranty
Your Goldair product has been inspected and testedand is guaranteed subject to the following for a period of two years from thedate of purchase against defects in workmanship and materials. During thisperiod, such defects will be rectified by repair or replacement of the productpurchased. Your product contains no user serviceable components and thiswarranty becomes invalid if in our opinion the product has been misused,abused, incorrectly installed, tampered with, connected to an electrical supplynot corresponding with the name plate specification, or subjected to powersurges. The warranty does not include any labour or other associated expensethat may be involved in removal or installation of the product. Normal wear andtear is expressly excluded. If your Goldair product fails to operatesatisfactorily, please return it to the retailer from whom it was purchased. Toobtain a repair or replacement product under this warranty, you will need toproduce satisfactory evidence of date of purchase. The completed warranty andpurchase receipt must be presented with the product. The warranty should befilled out at the time of purchase. It is in your interest to make sure this isdone.
If the product is to be replaced (cannot berepaired) then that replacement will be of the same or similar product oraccessory excluding packaging, instruction card etc. Where a replacementproduct is supplied, this shall be guaranteed for the balance of the originalwarranty period. Any model that is no longer available will be replaced by amodel of a value and with such features as we consider appropriate in thecircumstances. Goldair is not responsible for freight forwarding charges,losses or damage in transit. If service is required after the warranty periodhas expired, the product should be returned toa qualified electrical technician.Service outside of the warranty period will be at your cost. ConsumersGuarantee Act (1993). In accordance with the above act consumers are advisedthat: The manufacturer does not undertake that repair facilities and parts arenecessarily available for this product. If any of the provisions of theforegoing are contrary to any relevant legislation, then that provision shallbe deemed to be excluded from the warranty and the rest of the provisions willcontinue to apply.